Coco Coir Hydroponic Setup at Home: Easy Guide
Coir, originating as a natural byproduct of coconut processing, stems from the tough outer husks of coconuts, which would otherwise go to waste. Common applications of coco coir span from serving as a standalone growing medium or being blended with substances like perlite or vermiculite for hydroponic setups, container gardening, seed germination, and incorporation into potting mixes. Typically supplied in compacted bricks or blocks, coco coir undergoes hydration to expand several times its original size before being readied for use, offering a convenient and versatile solution for various gardening and construction needs. Coco coir Hydroponic setup at home provides a way to grow own vegetables and herbs at home.
How to Establish Coco Coir Hydroponic Setup at Home:
To begin, gather your materials, including coco coir (found in compressed bricks or blocks), a mold or container for shaping, water, and optionally, natural twine or string. While the coir is soaking, prepare your molds using small cups or cans, ensuring they match the desired pot size. Then, shape the pots by firmly pressing hydrated coco coir into the molds, ensuring even packing and leaving an indentation if planting seeds directly. Optionally, wrap natural twine around the molds for decorative flair and added stability. Allow the coir pots to dry completely, which may take a day or two depending on humidity levels, and speed up the process by placing them in a sunny spot or near gentle heat.
Role of Coco Coir in Hydroponics Setup:
- Hydration and Preparation:
Coco coir usually comes in compressed bricks or blocks. Before use, these bricks or blocks are hydrated by soaking them in water until they expand and soften. Once hydrated, the coir is fluffed up to ensure even distribution of moisture and air.
- Growing Medium:
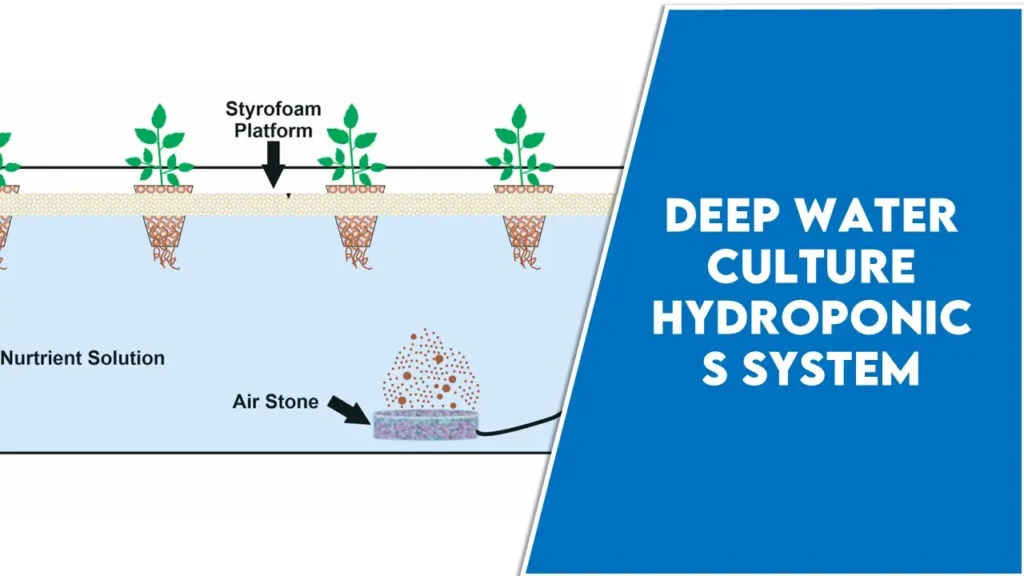
In hydroponic systems, coco coir can be used as a standalone growing medium or mixed with other substrates like perlite or vermiculite to improve drainage and aeration. It’s often used in various hydroponic setups such as flood and drain (ebb and flow), drip systems, or as a component in deep water culture (DWC) systems.
- Planting:
Plants can be directly planted into containers filled with coco coir or into grow bags or pots filled with a coco coir mixture. Immediately after planting irrigation with nutrient solution is recommended as coco coir does not contain any nutrients.
- Nutrient Delivery:
In hydroponic systems, nutrients are delivered directly to the plants’ roots through the nutrient solution. Coco coir acts as a substrate that holds moisture and nutrients, allowing the plant roots to absorb them as needed. It has a good retention capability of nutrients which makes nutrients available for the long term for plants.
- Maintenance:
Coco coir requires regular monitoring to ensure proper moisture levels and nutrient uptake. Hydroponic systems using coco coir typically require periodic flushing to prevent salt buildup and maintain optimal nutrient levels.
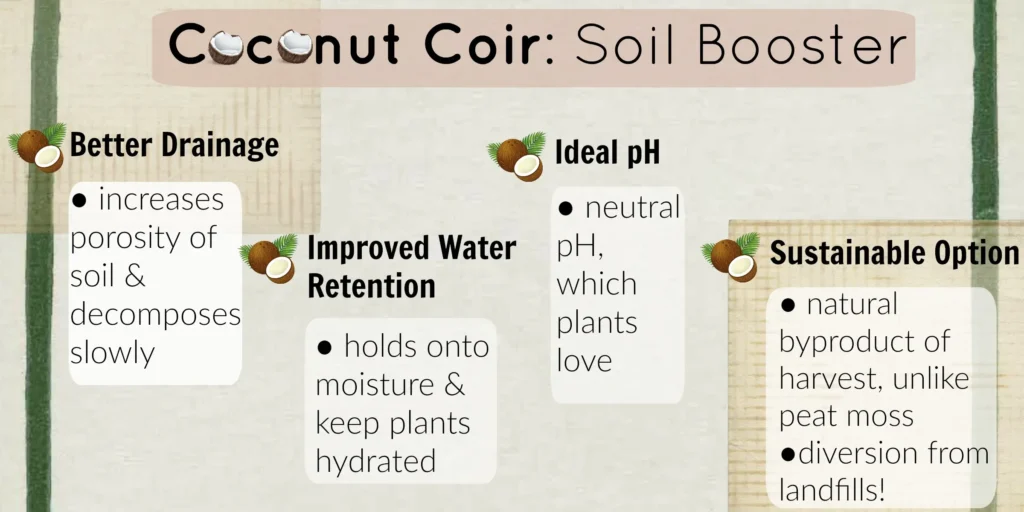
image source: Urban vine
- Reuse and Sustainability:
One of the advantages of coco coir in hydroponics is its sustainability. It cannot decompose or decay so that it can be used furthermore times. After harvesting of crops it can again be hydrated and used as growing medium for next crops and it also does not lose its properties.
Properties of Coco Coir:
- Neutral pH:
Coco coir is naturally a neutral pH material which can easily adapt for most of the crops or we can say a wide range of crops.
- Non Availability of Nutrients:
It does not contain any kind of nutritional properties meaning it does not contain nitrogen, phosphorus and potassium but it retains good water and nutrition if supplied. coco coir hydroponic setup at home is depend upon the nutrients other than coco coir.
- High Water Retention:
Among all growing mediums coco coir has almost the highest water retention power and it is highly Recommended trait with respect to growing medium.
- Light Weight:
It is a light weight material extracted from the husk of coconut and due to its light weight the pots are also lighter in weight with comparison to pots having filled with soils. This makes the management easy and comfortable.
- Recommended for Hydroponics:
It is highly recommended for hydroponics due to these upper mentioned features of coco coir. Major features which make it feasible or we can say the most appropriate are high water retention, absorption of nutrients from solution and make accessible for plants, neutral pH, and important one is light weight as in hydroponics more weight of growing medium cause difficulty in management.
- Proper Aeration to Roots:
Good anchor for plant roots as well as high number of pores for aeration to roots. Aeration helps with proper development of roots as well as of plants, ultimately improving the yield. If proper aeration conditions provides, the production in coco coir hydroponic setup at home increases.
Process to Use Coco Coir Bricks as Growing Medium:

image source: cococoirglobal
To create coco coir bricks for use as a growing medium, begin by assembling the necessary materials: coco coir fiber, typically available in compressed bricks or blocks, a large container or bucket, and water. Hydrate the coco coir brick by placing it in the container and gradually adding water, ensuring thorough saturation. Break apart the brick as needed to aid in even water absorption.
Let the coir soak for several hours until fully expanded and fluffy. Afterward, drain excess water from the coir, either by lifting it out of the water or gently squeezing it. Once drained, fluff up the hydrated coir to ensure uniform distribution and aeration. If desired for future use, shape the moistened coir into brick-sized blocks and allow them to air dry before storage. When ready to use, rehydrate the coco coir bricks by soaking them in water until they expand, then fluff them up before planting or placing them in containers.
Comparison of Coco Coir with other Growing Medium:
| Aspect | Coco Coir | Peat Moss | Perlite | Vermiculite |
| Water Retention | Excellent | High | Poor | Good |
| Aeration | Good | Decreases over time | Excellent | Good |
| pH Level | Neutral | Acidic | Neutral | Neutral |
| Nutrient Retention | Holds onto nutrients well | Can retain nutrients | Does not retain nutrients | Does not retain nutrients |
| Sustainability | Considered sustainable | Less sustainable due to harvesting | Not renewable | Not renewable |
| Cost and Availability | Widely available | Commonly available | Affordable and readily available | Affordable and readily available |
| Ease of Use | Easy to handle and work with | Requires moistening before use | Lightweight and easy to incorporate | Lightweight and easy to incorporate |
Pros and Cons of Coco Coir:
| Pros | Cons |
| Excellent water retention | Requires regular monitoring of nutrient levels |
| Good aeration | Potential for salinity buildup over time |
| Neutral pH | Low cation exchange capacity (CEC) |
| Sustainable | Initial cost may be higher |
| Reusable | Decomposition over time |
| Easy to handle |
Procedure of Coco Coir Hydroponic Setup at home:
- Materials Needed for Coco Coir Hydroponic Setup :
- Coco coir bricks or blocks
- Containers or growing trays
- Hydroponic nutrient solution
- pH testing kit
- Growing medium (optional, for seed starting)
- Preparation:
- Hydrate the coco coir bricks or blocks by soaking them in water until they expand and soften. Fluff up the hydrated coir to ensure even distribution and aeration.
- Setup:
- Fill containers or growing trays with the hydrated coco coir, leaving enough space for plant roots to grow.
- Set up a reservoir to hold the hydroponic nutrient solution. Ensure it’s large enough to accommodate the number of plants and has proper aeration.
- Planting in Coco Coir Hydroponic Setup :
- Plant seedlings or seeds directly into the coco coir, ensuring they’re positioned at the appropriate depth.
- If starting seeds, use a separate growing medium such as rockwool cubes or seedling trays until the seedlings are ready to transplant into the coco coir.
- Nutrient Management:
- Monitor the pH and nutrient levels of the hydroponic nutrient solution regularly using a pH testing kit.
- Adjust the pH of the nutrient solution as needed to maintain it within the optimal range for plant growth.
- Follow the manufacturer’s instructions for mixing and applying the hydroponic nutrient solution to ensure proper plant nutrition.
- Maintenance:
- Check the moisture levels of the coco coir regularly and water as needed to maintain consistent moisture for plant roots.
- One more thing is the nutrient amount to be checked as it may affect the growth and development of plants.
- Harvesting:
- Depending on the type of plants grown, harvest them when they reach maturity. Harvesting methods vary depending on the plant species and intended use.
- Cleaning and Reuse:
- After harvesting, clean and sterilize the coco coir to remove any remaining roots, debris, or pathogens.
- When it is properly sterilized and cleaned it can also be reused as a growing medium. It retains all his properties and it is a positive thing of this growing medium
Conclusion:
There are different kinds of growing mediums present in the market and also many choices of growing mediums are available. The selection of growing medium should be dependent upon the type of growing system and plant types. As we see coco coir is a wide range of adaptability for almost all crops. Coco coir has some pros and cons and after studying all that, the choice of coco coir is taken. But as it is neutral in pH and used for almost all crops made this a versatile growing medium and a trending growing medium.
Join Our Hydroponics Growers Group!
Connect with fellow hydroponics enthusiasts, share your ideas, ask questions, and grow together as a community.
👉 Join WhatsApp Group