
How to Grow Hydroponic Tulips: A Flower of Hope
One of the earliest and most vibrant springtime blooms, tulips are now among the simplest flowers to produce indoors hydroponically. Because it can be developed from bulbs and is almost completely pest-free, it is regarded as being easy to grow. The beautiful vision of tulips is finally experienced indoors by the people with the help of hydroponic gardening, which allows an innovative approach to traditional gardening techniques. It also permits year-round cultivation regardless of the weather outside.
Through precise control over fertilizers, water, and environmental conditions, hydroponics—a soilless growth method—offers an ideal growing environment for tulips. We are going to look at the vital components and techniques of hydroponic tulip growing in this version. Through this article, one will get to know the basics of hydroponic tulips and how to get started.
Steps to Grow Hydroponic Tulips
To know the answer to how to grow hydroponic tulips, one has to read the following details. Hydroponically, tulips can be grown from the bulb or from an emerged bulb. Let’s inspect these methods in brief through the given article.

Raising Hydroponic Tulips from Bulbs:
Just as simply as they can be grown in soil, tulips may also be grown hydroponically from bulbs. But growth from bulbs demands being prepared.
After placing the bulbs you purchased at a home center in a paper bag, seal it, and put it in the refrigerator for a short while. Experts refer to this to be the “vernalization process.”
Spring-flowering bulbs tend not to produce flower buds unless they survive the cold winter months, which is why the vernalization process occurs. Knowing that, keep it out of a cold environment. The optimum time of storage in a refrigerator is around 2-3 months.
When Raising Hydroponic Tulips from Sprouted Bulbs:
Vernalized bulbs” or “ice tulips” are sprouting bulbs that have passed through the vernalization process and are open for purchase.
This has the added advantage of permitting the grower to begin hydroponics right away after purchase, saving him from the trouble of long-term refrigeration in advance. It is suggested that one begin to raise hydroponic tulips from sprouted bulbs who wish to do it swiftly.
Different Varieties of Tulips to Grow Hydroponically
The early varieties of tulips to grow via hydroponics include Duc Van Tol, Single Early, and Double Early. The Mid-season varieties include Mendel and Triumph. Along with these, some of the late-season varieties that can be grown hydroponically are Darwin, Darwin Hybrids, Cottage, Double Late, and Species Tulips.
Instructions on How to Grow Hydroponic Tulips
Some of the specific pre-requisites that have to be followed for growing hydroponic tulips are:
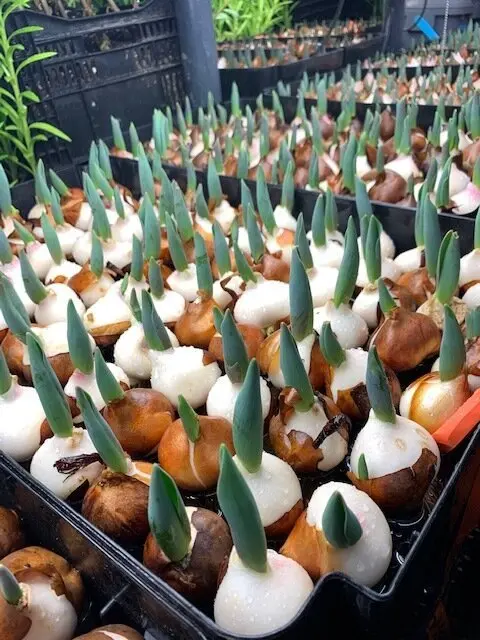
- Remove the outer brown layer of the bulb
Peel the brown outer skin of the vernalized bulb first. Take care not to cause damage to the area where the roots are developing while performing this. It’s important to remove the brown skin as soon as possible because if it gets damp it will blister and generate mold.
- Placing Bulbs in Suitable Hydroponic Containers
Place the bulbs in a hydroponic pot once the brown skin has been scraped. After that, add water to the container until the roots are immersed. Don’t use liquid fertilizer at this point.
- Position the Container in Some Dark Space
After the bulbs are placed in the containers, put them in the dark and out of direct sunlight and maintain the temperature at roughly 15°C (59°F).
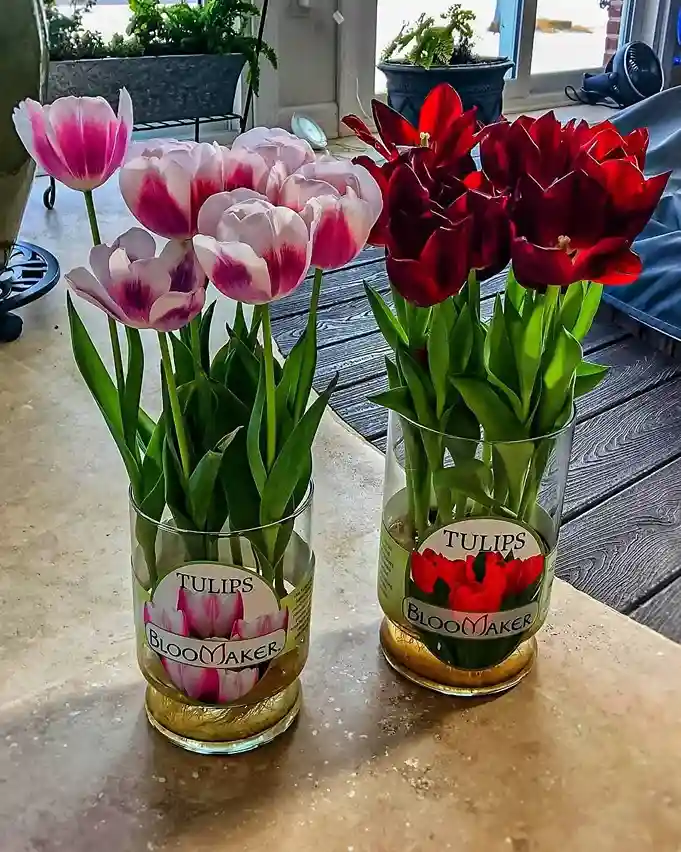
- Move the Container in Sunlight
As they grow up, relocate the hydroponic tulips to a bright area that is protected from the sun. By placing them in the sun, the bulbs will recognize the arrival of spring.
During this process, the roots will continue to develop, so make sure the water level is just low enough that it reaches the roots. If the tulips are cultivated in a warm room, it should be placed in a well-ventilated area because the former is more susceptible to mold growth.
Since water typically evaporates in warmer climates, it is best to replace the water once a day. Replace all of the water at this point, and then add one or two drops of liquid fertilizer. Take care not to fertilize too much since this causes root rot.
The brightly colored flowers of hydroponic tulips begin to bloom two to four weeks after the plant has been transferred to a warmer place.
Ideal Conditions for Tulips Production
Preparing bulbs for planting in trays:
The main three stages of the hydroponic tulips bulb’s annual replacement cycle include the root growth period, the floral bud elongation period, and the senescence period.
There are two kinds of tulip bulbs used in hydroponic systems:
Pre-cooled Bulbs: These are spring-flowering bulbs that are kept dry in storage, within 2 and 9 °C, after the start and development of the flowers, but just before planting.
Non-precooled Bulbs: These bulbs were kept at a non-chilling temperature of 15 to 17 degrees Celsius before planting.
Planting Technique:
Once pre-cooled bulbs have been planted in hydroponic trays, they are kept in an icy environment for 10 to 20 days, according on the cultivar, at a temperature between 4 to 6 °C.
Successful Hydroponic Tulips Cultivation: Key Points
Change the Water Daily, after Sprouting the Bulb
It is recommended to change the water every day once the buds have developed. This is because of the fact that dirty water facilitates the growth of fungus which gives rise to root rot.
Instead of adding the quantity of water to change it replace the full amount with clean water.
Place the Tulips in a Sunny Area
After the hydroponic tulips have sprouted while keeping them in the shade, place them in a sunny spot after they have sprouted. Achieving successful hydroponic tulip cultivation requires adjusting the arrangement depending on the buds’ growth.
Place the plants in a cool, dark spot away from the sun until they sprout to simulate overwintering; after they do, move them into the sun to create an appearance that spring is on its way.
Benefits of Hydroponic Tulips Growing
- The hydroponic method of growing tulips helps to reduce the period, energy, and overall cost of harvesting the flowers and hence it is less time-consuming and less energy intensive.
- Bulbs of hydroponic tulips can be chilled at low-temperature levels.
- It is comparatively a hygienic procedure with no use of soil.
- The newly formed bulbs are easy to clean in comparison with the bulbs that developed from soil because the former ones are water-grown so they don’t come in contact with the soil for contamination.
- Hydroponic tulip bulbs can be transferred to the soil even after they bloom.
Longevity of Hydroponic Tulips
The average life span of hydroponic tulips or the blooming period lasts about for a week. For a grower who wants a longer blooming period, increase the life cycle by keeping the bulbs at a temperature between 15-21℃. Take caution that the plant doesn’t receive too much heat which will ultimately reduce the life span of the plant.
The roots of the plant should be kept underwater but not submerged completely (⅔ of the height of the bulb should remain underwater.
Save Hydroponic Tulip Bulbs: A Step-by-Step Guide
The following process should be followed by any beginner grower to have a surety of successful comeback of the hydroponic tulip bulbs:
- Remove the bulbs from the system:
With the help of a small trowel or scoop, gently dislodge or remove the bulbs from their growing medium.
- Drying of the Bulbs:
Drying of bulbs should take place at a location with good air circulation, and somewhat shady, and less humid. The grower should ensure not to keep the bulbs in a closed manner during drying.
- Inspect the problems:
Proper examination of bulbs should be done from in and out. Larger, healthy bulbs should be considered for rebloom purposes in comparison to small bulbs.
- Storage preparation:
If the grower wants to store individual bulbs, then wrapping the bulbs in newspaper (with plain newsprint) is the best idea.
- Duration of Storage:
Tulip bulbs need enough chill time to set off proper flower formation.
The Harvesting Phase

When the petals begin showing their color but are still open to some extent, the harvesting procedure officially begins. The tulips raised through hydroponics are cut off from the stem and placed in the cold storage area.
Both the demand and the supply of tulips are growing rapidly. Nowadays, growers find that using hydroponic production technology makes them abundant profit to meet global demand for these magnificent flowers. Farmers of smaller areas can also grow tulips in a few trays to meet their local market’s demand.
Growers in India who choose quality over quantity might find an abundance of options in the Tulip production market.
Inference
Observing the roots grow is an interesting aspect of hydroponically cultivated tulips. Another benefit is that since no soil is used, there is almost little chance of illness or pests.
Your heart will surely be filled with happiness and joy when the tulips you have lovingly maintained bloom into colorful blossoms. Growing tulips hydroponically is easier than planting them on soil. Why not do it then?
Do You Really Know About Hydroponics? Let’s Play a Quiz!
Think you know everything about hydroponics? It’s time to put your knowledge to the test! Play this interactive quiz and challenge yourself with questions about soil-less farming, nutrient solutions, and the amazing world of hydroponics.
Hydroponics Puzzle Quiz Game
Test your knowledge and reasoning in hydroponics with this fun and interactive quiz game!
Congratulations!
Join Our Hydroponics Growers Group!
Connect with fellow hydroponics enthusiasts, share your ideas, ask questions, and grow together as a community.
👉 Join WhatsApp Group